
“Cloud” is a big name nowadays and rightfully so. It provides scalability, is economic (pay-per-use and reduced capital cost), flexible, globalization, reduced cost for technical infrastructures, and numerous other benefits.
One of the most common uses of “Clouds”, is shared or backup storage. A number of services provide free (limited) storage, and several provide an easy to use, comfortable interface, such as a folder (subdirectory) on your desktop where you may drop file to be automatically backed up (to the cloud service and retrieved – or even shared between users). Several of these services: Dropbox, Sugarsync, Skydrive, Googledrive, and iCloud offer free storage. These services not only provide storage services but also an Application Program Interface (API) where you can program your way of using those services.
Among these services, one prominent name is IBM. IBM Bluemix is a cloud platform as a service (PaaS). It supports several programming languages like Java, Node.js, Go, PHP, Python, Ruby Sinatra, Ruby on Rails. In this article I am going to describe how python can be used to store/delete files in bluemix object storage.
This tutorial works best with python 2.7.11 which you can find here. You also need to have pip installed. Do the following:
pip install python-swiftclient
pip install python-keystoneclient
pip install urllib3 certifi pyopenssl
If you are on windows you have to add “python -m” without quotes before “pip”. (python -m pip install…)
Step 1:
Create an IBM Bluemix account at the ibm.com/Bluemix. Then click on the Signup button and then register at the https://console.ng.bluemix.net/registration/

Step 2:
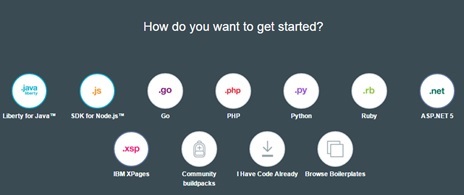
Click on dashboard then click on Cloud Foundry App then choose Web app. Now choose the starting point as python on this page.
Step 3:
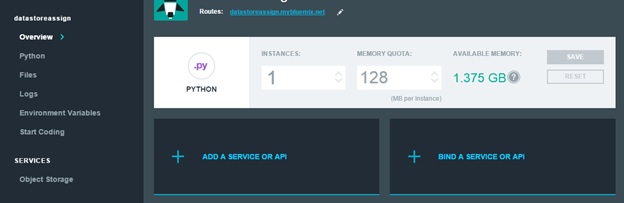
Provide app name and host in the prompt. Click on the application title to go to the overview page.
Step 4:
Please ensure Cloud Foundry command line interface tool is installed. Follow the instruction in the link below. https://www.ng.bluemix.net/docs/starters/install_cli.html
Step 5:
Click on the overview of the app and then click on Add a service or API.
Step 6:
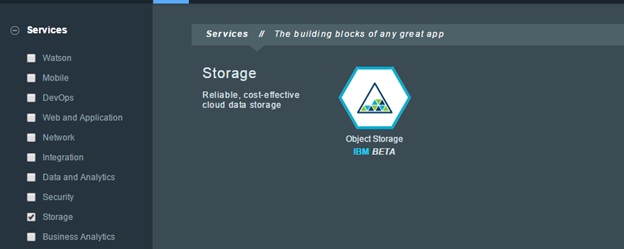
Under services -> select storage and then click on object storage IBM BETA.
Step 7:
Select plan as free and then click on create with the default values.
Step 8:
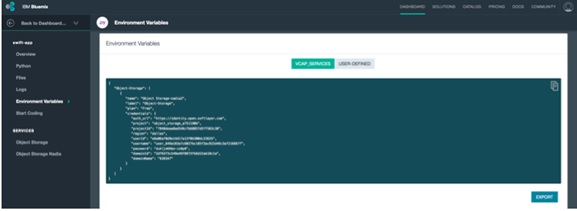
Connecting to V3 and authenticating through VCAP credentials. On the left side panel select ‘Environment Variables’. These are credentials associated with your Object Storage Instance, which your bound python application will utilize to connect.
Using python
import swiftclient
All of the values can be found at the “Environment Variables” section shown in step 8
auth_url = '<authorization URL>' #add '/v3' at the ending of URL
password = '<password>'
project_id = '<projectid>'
user_id = '<userid>'
region_name = '<regionname>'
Now it’s time to make the connection to the account. We will use swiftclient for this. Swift is an OpenStack object store project that offers cloud storage software so that you can store and retrieve data with a simple API.
pip install python-swiftclient – This is a python client for the Swift API. There’s a Python API (the swiftclient module), and a command-line script (swift).
python-keystoneclient – To authenticate from your local machine to Bluemix. This is a client for the OpenStack Identity API, implemented by the Keystone team; it contains a Python API (thekeystoneclient module) for OpenStack’s Identity Service.
conn = swiftclient.Connection(key=password,
       authurl=auth_url,
       auth_version='3',
       os_options={'project_id': project_id,
                'user_id': user_id,
                'region_name': region_name})
Now you (locally to the bluemix) can create a new container to the datastore using
cont_name = '<container name>'
conn.put_container(cont_name)
Storage containers are similar to folders (directories) which hold the objects or buckets in Amazon Web Services (AWS).
Then, you can upload the file to the container by using put_object function as below:
file_name = '<filename>'
with open(file_name, 'r') as upload_file:
    conn.put_object(cont_name, file_name, contents= upload_file.read())
Above code assumes that the file is in the current local directory. If it is in any other directory you will have to include the path also.
You can delete the file by using delete_object function
conn.delete_object(<containername>, <filename>)
Similarly you can download the file by using get_object function and then writing to content to the file as follows:
conn.get_object(<containername>, <filename>)
with open(<filename>, 'w') as f:
    f.write(obj[1])